It is often customary to give the newlyweds a few congratulations along the way. Here we show you how to do this in the form of a book that each guest can immortalize during the wedding and that you can leaf through together later. There is also space on the cover to stick one or more wedding photos on later. If you don't fill the book completely, you also have the option of sticking in more photos as memories.
Step 1: Make envelopes and cards
First, download the templates for the envelopes and print out the ones you need. There is one version for a rectangular envelope and one for a square envelope.
Now cut out the template and transfer it to the craft cardboard sheet. with a pencil. Then cut everything out and fold along the dotted lines of the templates. It's easier with a ruler and it will be straight. Trace the creases with your fingernail or a folding bone. Then glue the cards together. The longer flap remains outside. Make sure that you don't accidentally glue the inside of the envelope together.

The steps are the same for both sizes, they are optimized for the ring binder and can be arranged in different ways. More on this later. If you don't want to make your own, you can use ready-made envelopes in suitable sizes.

The cards are then made from white craft cardboard sheet . These should be 10 x 6.5 cm for the rectangular envelopes and 9.5 x 9.5 cm for the square ones.
Step 2: Design the book pages
First, the scrapbook-Paper is glued on and then cut to size. This has the advantage that it fits exactly and there are no gaps. Be careful not to apply the liquid glue too thickly, otherwise the Paper. will curl. Use an old paintbrush or glue stick if necessary.
Once the glue has dried, turn each side over, place it on a cutting mat and cut off any protruding edges.
<img src="/tn.php?id=163614&width=667&height=500&templang=en" title="Guestbook:<protected> Paper" alt="" height="450" width="600">
To attach the envelopes, use double-sided adhesive tape.This makes it easier to place them and they stick immediately. Depending on the size of the envelope, stick on 2-3 strips. In addition to the six options, there are of course others. The total quantity also depends on the number of guests.

The first page is left blank so that you can design it later - just like the cover - with die-cut parts. You can write a few words for your guests or other important dates or things about the wedding there later.

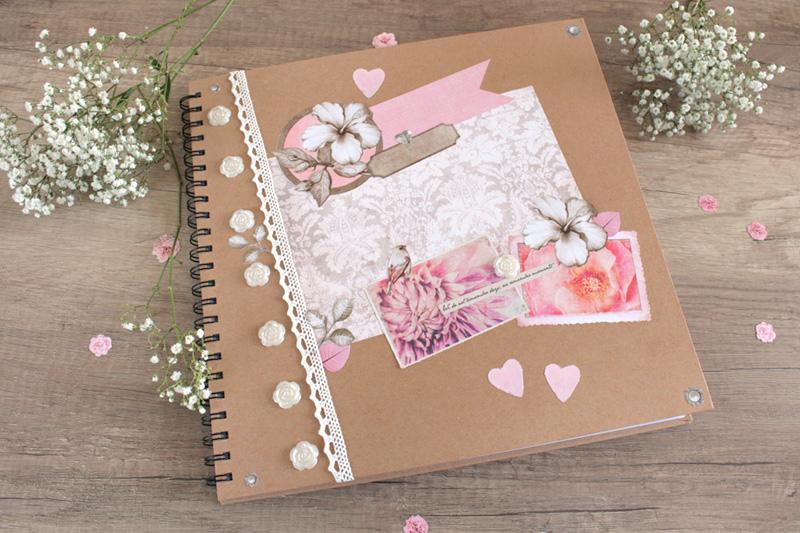
Step 3: Decorate the cover
You can now decorate the cover as you wish with the die-cuts, roses and lace trim. If you are unsure how you want to attach what, first lay the individual elements loosely and move them around until you are happy with the result. Only then should you stick them on one by one. If you make the picture beforehand, you can get it exactly the same again.
For the lace edging, use double-sided adhesive tape. It smears less and sticks immediately. To prevent the ends from fraying or coming loose, cut them slightly longer and then glue them on the inside. Cut the roses apart to increase the distance.

Once everything is well attached, label the book. For example, you can write the couple's names in the pink pennant on the cover and the Date in the smaller field below. Lay it out in the entrance area on the wedding day. The cards should be placed next to it with a pen so that everyone can sign in and then choose an envelope.
Have fun copying it!