- Secure order
- Easy return shipment
- Service-Hotline 03 69 61 69 10
Instructions No. 3393
Difficulty: Advanced
Working time: 4 Hours
Creative DIY-Guide: Your personal meal plan with charm
Are you fed up of cooking the same dishes week after week? Everyone probably has a few standard recipes that go quickly and always serve as an emergency solution. Especially when you've forgotten to go shopping or you don't really have an idea for something else. A weekly meal plan can help with this and provide more variety. Because if you plan ahead, you can also shop accordingly.
A creative weekly menu plan is not only only helpful, but also a nice piece of decoration. In this step-by-step guide, we'll show you how to create your own unique meal plan. 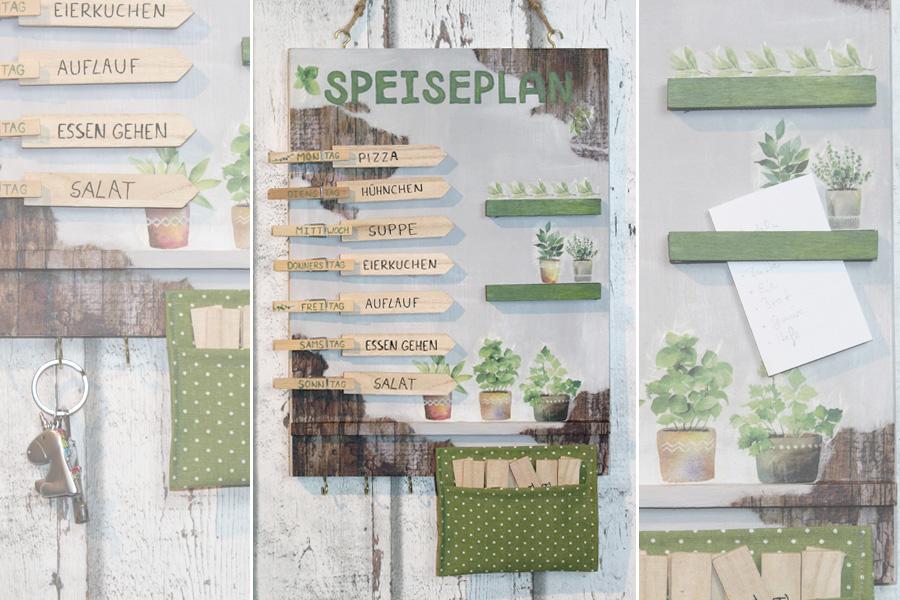
Step 1: Prepare and decorate the base plate
Before you get started, lay out all the elements on the plate to estimate how much space you need for the individual parts. If you want to modify the planner, now is the right time to take this to heart.
Cut a square strip to the right length using a fretsaw or similar and glue it in place using handicraft glue . Once dry, paint the panel and the strip with concrete paint. To highlight certain areas, you can also lighten them with a little white paint. Let everything dry well.
<img src="/tn.php?id=305217&width=600&height=450&templang=en" alt="Preparing the base plate for the<protected> <protected>DIY</protected> </protected>Weekly meal plan" width="600" height="450" data-mid="305217" title="DIY Weekly meal plan: Prepare the base plate">To make your planner more lively, decorate it with motif straw silk. Tear or cut the desired pieces and apply them with decoupage varnish . Apply the glue with a brush from the inside to the outside and use it to adjust any uneven surfaces. Here too: allow everything to dry well.
<img src="/tn.php?id=305219&width=600&height=450&templang=en" alt="Base plate for the<protected> <protected>DIY</protected> </protected>Decorating the weekly menu" width="600" height="450" data-mid="305219" title="DIY Weekly menu: Decorating the base plate">
Step 2: Apply lettering
While the base plate is drying, pick up the fence slats and staples to write on them. If necessary, prime them with paint beforehand. Apply paint to the magnetic holders only , but they can also be left unpainted in their natural look.
Apply the lettering to the top of the base plate. A paper template will help you to position the letters correctly. First draw them in with a pencil and then color them in with paint.
<img src="/tn.php?id=305223&width=600&height=450&templang=en" alt="The base plate for the<protected> <protected>DIY</protected> </protected>Labeling the weekly menu plan" width="600" height="450" data-mid="305223" title="DIY Weekly menu plan: Labeling the base plate">
Step 3: Glue on, decorate, drill
As soon as the paint has dried, glue the prepared elements to the base plate using handicraft glue . Select other matching motifs from motif straw silk and also attach them with decoupage varnish.
To hang up the board, carefully drill holes for the hooks. The drill bit should be smaller than the screw thread of the hooks. Screw in the hooks and secure them well.
Make sure you leave enough space for the paper bag. If necessary, carry out this step last.
<img src="/tn.php?id=305227&width=600&height=450&templang=en" alt="Drill holes in the base plate of the meal plan to hang and attach the hooks" width="600" height="450" data-mid="305227" title="Drill holes in the base plate of the meal plan to hang and attach the hooks"DIY Weekly menu plan: Drilling">
Step 4: Sew and attach the bag
Choose a piece of fabric and fold it as shown in the picture. The right edge must be only 1-2 cm wide. The other edge depends on how deep you want the bag to be. There should be enough space for your recipe cards. Sew the edges.
Determine the width of the bag, add seam allowance (at least 1 cm) and cut the fabric to size.
<img src="/tn.php?id=305235&width=600&height=450&templang=en" alt="fabric cut for cutting the bag for the craft idea" width="600" height="450" data-mid="305235" title="DIY Weekly menu: fabric cut ">Now fold the unhemmed edges inwards, put the bag back together and sew the edges closed. Use a recipe slip to check that everything fits.
<img src="/tn.php?id=305237&width=600&height=450&templang=en" alt="Sew up the edges of the fabric cutting for the craft instructions" width="600" height="450" data-mid="305237" title="DIY Weekly menu: Sew together fabric cut ">Stick the finished note bag firmly to your planner using handicraft glue . Press it down firmly and your personalized meal plan is ready!
Have fun making your own and plan your weekly menus with ease!
Ready to design your own meal plan? Visit our online store and order the materials you need today!